Questo suggerimento ti aiuterà a migliorare l'uso degli hashtag (tag parole chiave) sul tuo forum.
Offriamo due codici Javascript per questo, quindi assicurati prima di iniziare che la gestione dei codici Javascript sia attivata.
Opzioni HashtagQuesta modifica ti darà un pannello di opzioni per i tuoi hashtag, potrai seguire rapidamente l'hashtag, vedere i soggetti taggati con esso e gestire i tuoi tag.
Codice JavascriptAndiamo verso Pannello di amministrazione ► Moduli ► HTML & Javascript ► Gestione del codice Javascript e creiamo un nuovo codice con le seguenti impostazioni:
- Titolo: a tua scelta
- Dove: In tutte le pagine
- Codice:
- Codice:
$(function() {
   var a = document.getElementsByTagName('A'), b = document.createElement('DIV'), i = 0, j = a.length, actif, t;
   b.className = 'fa-hashtag-options';
   b.style.display = 'none';
   document.body.appendChild(b);

   for (; i<j; i++) {
      if (a[i].title && /\/tags\//.test(a[i].href) && /^#/.test(a[i].innerHTML)) {
         a[i].className += ' fa-hashtag';

         a[i].onclick = function() {

            if (actif != this) {
               actif = this, t = this.innerHTML;
               t.length > 24 && (t = t.slice(0, 25).replace(/^\s+|\s+$/g, '') + '...');

               b.style.left = $(this).offset().left + 'px';
               b.style.top = $(this).offset().top + 'px';
               b.innerHTML = '<div class="fa-hashtag-title">Options pour <span class="fa-hashtag-tag">' + t + '</span></div><b>• </b><a href="' + this.href + '">Vedi gli argomenti taggati</a>' + (_userdata.session_logged_in ? '<form method="post" name="addtag_form" action="/profile?mode=editprofile&page_profil=tags&start&submit=1"><b>• </b><a href="#" onclick="this.parentNode.submit();return false;">Segui<span class="fa-hashtag-tag">' + t + '</span></a><input name="addtag" type="hidden" value="' + this.innerHTML.slice(1) + '"></form><b>• </b><a href="/profile?mode=editprofile&page_profil=tags">Gestisci i miei hashtag</a>' : '');

               /none/.test(b.style.display) && (b.style.display = 'block');
            } else {
               actif = null;
               b.style.display = 'none';
            }

            return false;
           };
      }
   }
});
Personalizzazione CSSOra affinché il popup venga visualizzato correttamente, è necessario aggiungere alcuni CSS. Incolla il seguente codice nel tuo foglio di stile CSS a Pannello di amministrazione ► Visualizzazione ► CSS ► Foglio di stile CSS
- Codice:
/* options du menu des hashtags */
.fa-hashtag-options {
  color:#666;
  font-size:11px;
  font-family:Verdana,Arial,Helvetica,sans-serif;
  line-height:14px;
  background:#EEE;
  border:1px solid #CCC;
  border-radius:3px;
  box-shadow:0 3px 6px rgba(0, 0, 0, 0.175);
  margin-top:20px;
  padding:3px;
  position:absolute;
  z-index:100;
}

/* options du titre */
.fa-hashtag-title {
  font-size:12px;
  border-bottom:1px solid #CCC;
  padding-bottom:3px;
  margin-bottom:3px;
}

/* options des liens */
.fa-hashtag-options a {
  color:#333;
  text-decoration:none;
  display:inline-block;
  padding:2px 6px 2px 0;
}

.fa-hashtag-options a:hover {
  color:#666;
  text-decoration:underline;
}

/* options des mots gras */
.fa-hashtag-options b {
  color:#333;
  padding-left:6px;
}

/* options des tags */
.fa-hashtag-tag {
  color:#000;
  font-weight:bold;
}
Lo script aggiunge una classe a tutti gli hashtag nei post, quindi se vuoi aggiungere uno stile unico agli hashtag puoi farlo con questo codice:
- Codice:
/* hashtag style */
a.fa-hashtag {
  color:#666;
  text-decoration:none;
  background-color:#EEE;
  border:1px solid #CCC;
  border-radius:3px;
  display:inline-block;
  padding:3px;
}

a.fa-hashtag:hover {
  color:#333;
  background-color:#DDD;
  border-color:#999;
}
Il risultato predefinito è questo, ma puoi modificarlo a tuo piacimento 
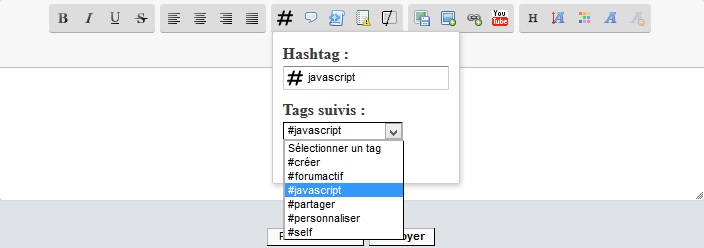
Pulsante hashtag nell'editor dei messaggiQuesta modifica ti consentirà di aggiungere un pulsante all'editor dei messaggi. Puoi quindi inserire un hashtag o sceglierne uno da un elenco predefinito di tag che segui.
Codice JavascriptAndiamo verso Pannello di amministrazione ► Moduli ► HTML & Javascript ► Gestione del codice Javascript e creiamo un nuovo codice con le seguenti impostazioni:
- Titolo: a tua scelta
- Dove: in tutte le pagine
- Codice:
- Codice:
$(function(){
   if (!$.sceditor || /\/privmsg/.test(window.location.pathname)) return;
   var storage = window.localStorage, s = document.createElement('SELECT'), tags = '';

   if (storage && storage.faTags && storage.faTagsExp > +new Date - 29*59*1000 && storage.faTagsUser == _userdata.username) s.innerHTML = storage.faTags;
   else {
      $.get('/profile?mode=editprofile&page_profil=tags', function(d) {
         var h = $('form[name="tag_list"] a', d);

         if (h.length) {
            for (var i = 0, j = h.length, txt; i<j; i++) {
                 txt = h[i].innerHTML.replace(/^\s+|\s+$/g,'');
                 if (/^#/.test(txt)) {
                  !tags && (tags += '<option value="">Sélectionner un tag</option>');
                  tags += '<option value="'+ txt.slice(1) +'">' + (txt.length > 24 ? txt.slice(0, 25) + '...' : txt) + '</option>';
                 }
            }
            s.innerHTML = tags;
         }

         if (storage) {
            storage.faTags = tags ? tags : 0;
            storage.faTagsUser = _userdata.username;
            storage.faTagsExp = +new Date;
         }
      });
   }


   $.sceditor.command.set('hashtag', {
      dropDown : function(editor, caller, callback) {
         var a = document.createElement('DIV'), b = document.createElement('INPUT'), c = document.createElement('INPUT');
         b.type = 'button';
         b.value = 'Insert';
         b.className = 'button';

         c.type = 'text';
         c.id = 'fa-hashtag';

         a.innerHTML = '<div><label for="fa-hashtag">Hashtag :</label></div>' + ( s.innerHTML ? '<div><label>Tags seguiti:</label></div>' : '' ) + '<div></div>';
         a.firstChild.appendChild(c);
         a.lastChild.appendChild(b);

         if (s.innerHTML != 0) {
            s.value = '';
            a.getElementsByTagName('DIV')[1].appendChild(s);
            s.onchange = function() {
               c.value = s.value;
            };
         }

         b.onclick = function() {
            c.value && callback(c.value);
            editor.closeDropDown(true);
         };

         editor.createDropDown(caller, 'inserthashtag', a);
      },

      exec : function(c) { tag(c, this) },
      txtExec : function(c) { tag(c, this) },

      tooltip : 'Inserisci un Hashtag'
   });

   toolbar = toolbar.replace(/quote,/,'hashtag,quote,');

   function tag(c, e) {
      $.sceditor.command.get('hashtag').dropDown(e, c, function(tag) {
         e.insertText('#' + tag.replace(/^#/,'').replace(/[\xD7\xF7\x00-\x2F\x3A-\x40\x5B-\x60\x7B-\xBF]/g, '_') + ' ');
      });
   }
});
Attenzione: i caratteri non validi verranno sostituiti da un _ all'inserimento.
Personalizzazione CSSOra affinché il popup venga visualizzato correttamente, è necessario aggiungere alcuni CSS. Incolla il seguente codice nel tuo foglio di stile CSS a Pannello di amministrazione ► Visualizzazione ► CSS ► Foglio di stile CSS
- Codice:
/* image du bouton hashtag */
.sceditor-button-hashtag div { background-image:url(http://i19.servimg.com/u/f19/19/06/98/92/scehas11.png) !important }

/* menu déroulant des hashtags */
#fa-hashtag {
  background:url(http://i19.servimg.com/u/f19/19/06/98/92/scehas11.png) no-repeat 3px 50% #FFF;
  padding-left:22px;
}
Salva e il tutto è configurato 
|
 Opzioni avanzate per gli #hashtag

 Argomenti simili
 Indice


 Da
Da 


 Facebook
 Twitter
 Youtube
